
Authentik #
There are a variety of SAAS offerings to provide SAML / OAUTH2 services, like Okta, and PingID. However, if you want to run this in your home lab or in a isolated environment, you may want to run your own authentication service. I looked at several offerings and none really seemed to offer all the functionality that I am looking for. That was until I found Authentik. Here is a feature comparison from their website. This is current as of the date of this article.
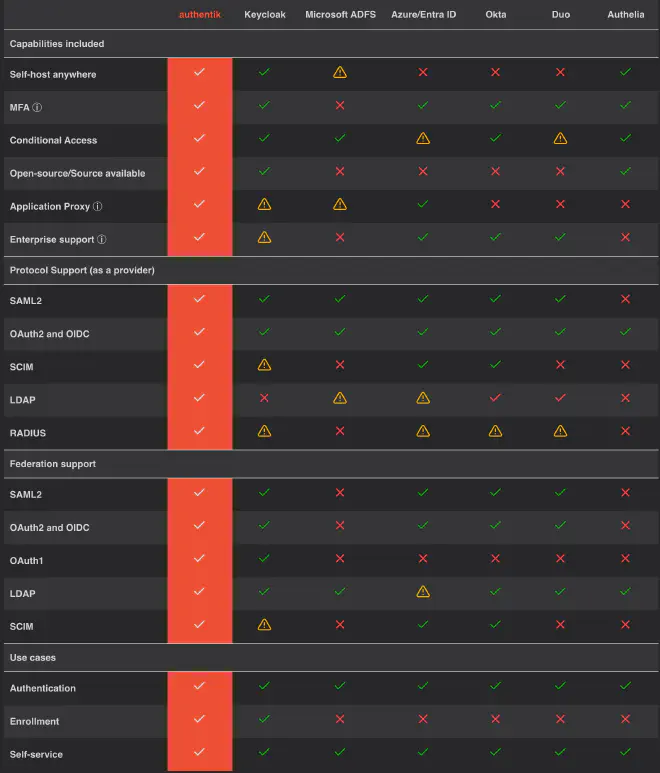
It supports all of the authn protocols that I might want (SAML, OIDC, SCIM, and Radius) plus it will function as an application proxy with authentication support. I believe that it has a full API (we will be testing this), and we can perform our own self service, including enrollment. So let’s check it out.
Installation Options #
Authentik can be installed using either Docker Compose or Kubernetes. For this walkthrough, we will be using Docker Compose and installing everything on a AWS EC2 instance.
Configuration #
There are a ton of options that can be set by environment variables to change the default values of the setup process. Those are documented here Configuration Options
Hardware Requirements #
Authentik has a very reasonable hardware requirements.
- CPU: A host with at least 2 CPUs
- Docker Desktop or Linux cli
- Docker Compose (V2 is recommended and will be used here).
When selecting the instances that I’ll use for a workload, especially when I am paying for it is I want the lowest cost instances that I can get. If the workload supports ARM, then that is my first move. Since Authentik does come with container images built for both AMD64 and ARM64 architectures. So pricing out both options:
Instance Pricing #

I can save almost a $1.50 a month by using a Graviton instance, therefore we will go that route. Let start configuring our environment.
Authentik Setup in AWS #
VPC configuration #
First, we need to setup a VPC to contain the server that we will be deploying later in this walkthrough. To perform these steps just login to your AWS account, and then goto the VPC option. Then click on your VPCs and click the create VPC button.
-
In this case, we need subnets and routes, and everything else, so select ‘VCP and more’.
-
For the VPC name, i’ve called mine authentik, which will create a vpc called authentik-vpc. and taken most of the default settings, then click on the Create VPC button.

- Once the VPC creation has completed successfully you will see a confirmation page similar to this.

- Now that we have a VPC to hold our authentik server, we can start to deploy that server.
EC2 Configuration #
-
To create our authentik server, go to EC2, then click on Instances and click on the Launch Instances button.
-
On the Launch an instance page, I will walk you through each entry that you need to make to properly deploy your Authentik server. From the top you need to name the instance. I generally use the FQDN of the server as it’s name. I’ll call this instance authentik.myexample.me, as I will be using the myexample.me TLD.

- On the Application and OS Images section, is where we set the type and size of instance that we want to use, and the Operating System we want on that instance. In this case, we have already selected the Architecture, which will be 64-bit (Arm) and the Operating System will be Ubuntu 24.04 LTS.

- On the Instance type section, is where you set the type of instance you want to use. On the spreadsheet above, we have already priced out a t4g.small, so that is what we will select.

- The next step is to select, or create and select an SSH key pair so that you can SSH into the instance after we set it up.

- The next step is the Network settings section. Here click the edit button, and set your VPC to the one created above. The subnet can be set to any PUBLIC subnet. I will disable Auto-assign a public IP address on this instance.
-
To setup the Security group, first name it. I’ll use the same name that I used to name the instance. I’ll use the same value for the description as well.
-
We need to setup three rules, the first will be to allow SSH from my IP address only!
-
The next two rules are for HTTP, and HTTPS open to the internet.
-
The last setting is to configure the amount of storage that you need. I will set this to 32GB which in my testing has been more then enough so far.

-
These are all the settings that I have used for my authentik instance. Once your setting are correct, click on the Launch instance button.
-
Once the instance is created, we need to setup an IP address and DNS before we can connect to it. First create an assign an elastic IP address to this instance.

-
The last thing that we need to do is to setup DNS and then we should be able to connect to the instance.
-
Goto Route53 and create an ‘A’ record for your host. In this case I set my TTL to 1 day as this IP should never change.
SSH into the server #
- Now we should be able to SSH into our newly created instance. So authenticate into it as the ‘ubuntu’ user with the SSH key you specified above.

- Next we need to update the server.
sudo apt update
sudo apt upgrade
Install docker #
-
We need docker and docker compose to run authentik. The installation instructions for docker on Ubuntu are here Docker Install on Ubuntu
-
First we need to setup the docker repository. Just copy and paste the code below into a bash shell.
# Add Docker's official GPG key:
sudo apt-get update
sudo apt-get install ca-certificates curl
sudo install -m 0755 -d /etc/apt/keyrings
sudo curl -fsSL https://download.docker.com/linux/ubuntu/gpg -o /etc/apt/keyrings/docker.asc
sudo chmod a+r /etc/apt/keyrings/docker.asc

# Add the repository to Apt sources:
echo \
  "deb [arch=$(dpkg --print-architecture) signed-by=/etc/apt/keyrings/docker.asc] https://download.docker.com/linux/ubuntu \
  $(. /etc/os-release && echo "$VERSION_CODENAME") stable" | \
  sudo tee /etc/apt/sources.list.d/docker.list > /dev/null
sudo apt-get update
- To install the latest version of docker run
sudo apt-get install docker-ce docker-ce-cli containerd.io docker-buildx-plugin docker-compose-plugin
- Verify that the docker engine install was completed successfully by running the hello-world container.
sudo docker run hello-world

- Next you need to add the account that you are logged in with to the docker group. This allows you to run docker commands without needing to use sudo.
sudo usermod -aG docker $USER
- The last thing that we need to do is to setup docker to autostart with our host.
sudo systemctl enable docker.service
sudo systemctl enable containerd.service
- The last task is to reboot our server and then SSH back in once the reboot is complete.
Installing Authentik #
-
I am going to walk you though the Authentik installation. We will be following the instructions posted here. Authentik installation instructions
-
The first step is we need to download a docker-compose file to start the installation.
mkdir authentik
cd authentik/
wget https://goauthentik.io/docker-compose.yml

- Next we need to generate a password for the PostgresSQL server and a secret key for Authentik.

- We want to enable error reporting. Running this command will add that configuration to the .env file.
echo "AUTHENTIK_ERROR_REPORTING__ENABLED=true" >> .env
Authentik email support #
To setup email support for Authentik you need an email server that the server can access. I’ll configure AWS Simple Email Service (AWS SES) so that authentik can use it to send emails.
- Back to the AWS console, and then select SES. Click on the Get started button.

- Then click on SMTP settings on the left menu and click on Create SMTP credentials button.

- A new tab will open and display a policy that will be attached to the SMTP user you are creating. The default policy is fine in this case, as it only grants the ses:SendRawEmail privilege. You can then click on the Create user button.

- AWS will then display the credentials for your SMTP user. Make sure that you save these as this is the only time they will be displayed.

- Now go back to the SSH session on the server and edit the .env file we are working on.
nano .env
- And paste in this configuration snippet.
# SMTP Host Emails are sent to
AUTHENTIK_EMAIL__HOST=localhost
AUTHENTIK_EMAIL__PORT=25
# Optionally authenticate (don't add quotation marks to your password)
AUTHENTIK_EMAIL__USERNAME=
AUTHENTIK_EMAIL__PASSWORD=
# Use StartTLS
AUTHENTIK_EMAIL__USE_TLS=false
# Use SSL
AUTHENTIK_EMAIL__USE_SSL=false
AUTHENTIK_EMAIL__TIMEOUT=10
# Email address authentik will send from, should have a correct @domain
AUTHENTIK_EMAIL__FROM=authentik@localhost
And edit these values as needed. mine look like this after editing.

The other thing that I noticed was my Secret key for Authentik was spread across two lines, so I removed the extra return and then saved my file back to disk.
- The last setting change that we need to make is to set the ports that Authentik will open and listen on. The default ports are 9000 for HTTP and 9443 for HTTPS. I want to use the standard well known ports for both protocols so add this to your .env file.
COMPOSE_PORT_HTTP=80
COMPOSE_PORT_HTTPS=443
- Now our configuration is complete. Let’s start authentik and make sure that everything is functioning properly. First i’ll start the docker-compose file and then watch the logs.
docker compose pull
docker compose up -d
docker ps
docker logs -f 3f4
as you watch the logs you will see a lot of database migrations as the database is setup and populated. It might take a few minutes for authentik to become ready. Open a web browser and goto
https://your.server.tld/if/flow/initial-setup/
This URL is the setup URL for a new instance of Authentik. Until the server is fully ready, you will see an error like this when you goto the setup URL.

Just wait another minute or two an then refresh until you see this screen.

Enter your email and enter and confirm your password, and then click Continue.

I am in the My applications list, which is currently blank. We will take care of more configuration and setting up applications in next article in this series.